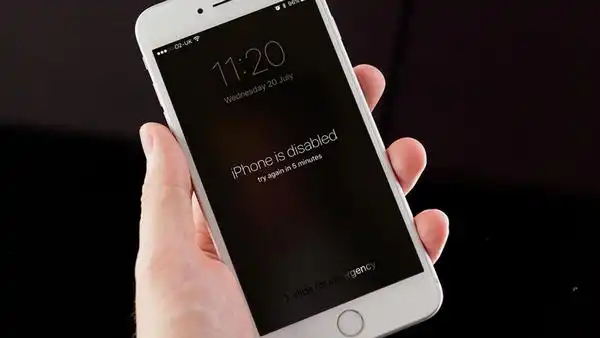
If you have entered the incorrect passcode on iPhone 11 multiple times, then you will receive a pop-up message on iPhone screen saying iPhone is disabled. At this point, you don't need to get panic as here you will get the 4 efficient ways to get rid of this issue. The methods are illustrated in step by step manner that will help you to fix the disabled iPhone 11 efficiently.
But before moving ahead, you must know why Apple has embedded such feature on the iPhone, is it for safety or something else?
Well, this feature is mainly for safe reason, which protects the device from the thieves and the hackers. But, these security feature annoys the users sometimes because they forgot iPhone passcode. The iPhone will be totally useless if it is in disabled state.
Might be you are in a hurry to get rid of the iPhone 11 disabled issue, but you must be aware that following these methods may wipe all the data from the device. So, you must take a backup of your iPhone11. However, if you retain the backup, then skip this section and directly move to the solution part.
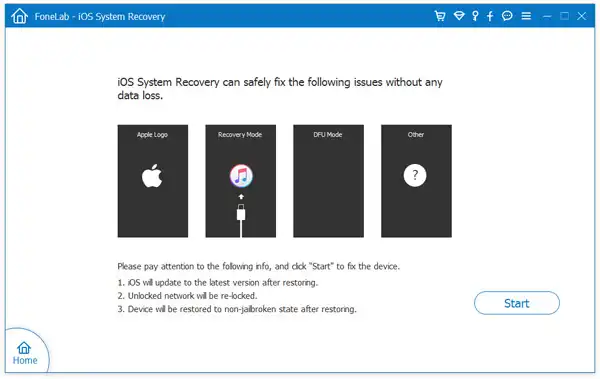
Among all the solutions we shared in this article, iOS System Recovery is the most user-friendly one and has a higher success rate. It is a comprehensive tool that can fix major issues on iPhone and brings back iPhone to working condition. It simplifies the work and reduces the time dramatically. Moreover, you will get the pleasant result in no time. The tool also resolves iPhone 11 connecting to iTunes issue, endless rebooting, stuck at Apple logo, and many more. You can now use iOS System Recovery on a PC or Mac to fix iPhone 11 disabled issue.
Download and install iOS System Recovery application on a working computer. It can be a PC or Mac. Launch the application and click More tools from left side to reach iOS System Recovery page.
Now, connect your iPhone 11 to computer using the lightning cable and the software will detect the device immediately. Just confirm it and then click on the Start button. After that, you have to follow the on-screen instruction to put iPhone 11 into Recovery mode.
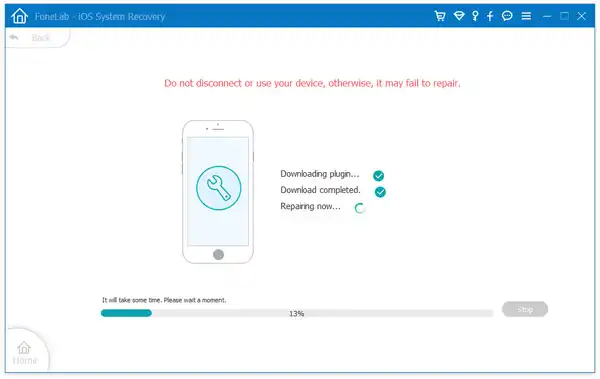
When iOS System Recovery detects the iPhone 11 in Recovery mode, it will download the firmware package for that device from Apple remote server. Once the download is completed, it will flash the new firmware to iPhone 11 to fix the iPhone disabled issue.
After several mouse clicks, the disabled iPhone 11 will be back to normal in a few minutes. This is the best software you can find to fix this in such an elegant manner.
This is the conventional and most effective way to fix iPhone disabled error. This method will help you to reset iPhone 11 and thereafter enable the users restoring iPhone 11 from previous backup. It is applicable only when Find My iPhone feature is turned off. However, if you have enabled this feature then you can use the iCloud method to fix the issue that is mentioned below in this article.
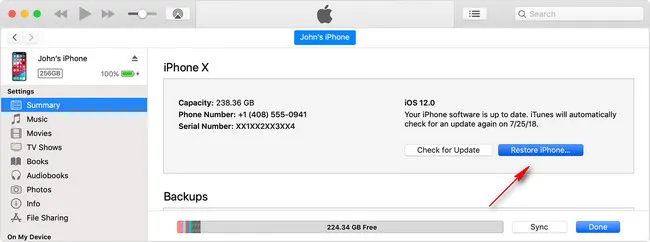
Step 1: If your backup process is completed, then directly move to the main interface of iTunes.
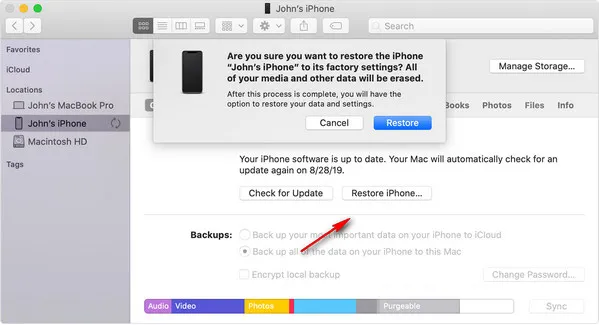
Step 2: Now, click on the device icon located at the left panel of the iTunes window and further click on the Summary.
Step 3: Here, you will get a few options, just click on Restore iPhone. iTunes will download the latest version of OS on the iPhone and the entire process will take around half an hour.
Step 4: Once the process is completed, you will get the setup option on iPhone, and here you need to select the Restore from option.
Step 5: Select the recent backup and then wait for a moment as iTunes will take time to restore iPhone 11 from local backup.

After the completion of the process, your iPhone will be back in the state where it was. This way iTunes helped you to fix the disabled issue on iPhone 11. Apart from fixing the issue, iTunes also helps the users to update the iOS firmware and synchronize the data from computer to iPhone 11.
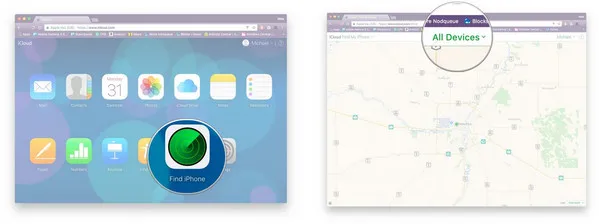
In this method, you will use Find My iPhone feature that is a subset of iCloud to fix a disabled iPhone 11. This feature helps you to locate your device and also erase the device remotely. After that, the disabled iPhone will be back to normal. This is quite useful when you lost your iPhone 11 and before that, fortunately, you had enabled Find My iPhone feature.
Step 1: On your computer, launch a browser and sign-in on iCloud account by providing your Apple credentials.
Step 2: Soon, you will get a bunch of options, click on Find My iPhone. To view the list of devices, click on All Devices and then select your iPhone 11.
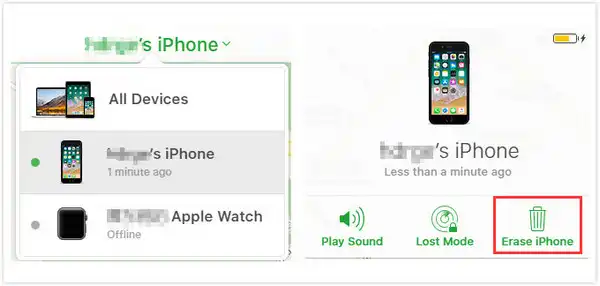
Step 3: At the top-right corner, you will get few options, such as Play Sound, Lost Mode, and Erase iPhone, click on Erase iPhone. Now, input your Apple ID password to start the erasing process.
Step 4: Your iPhone 11 will be reset in a short time and after that, you need to go for the set up process. At the time when you land to App and Data section, select Restore from iCloud backup option.
Step 5: Enter Apple ID and Password and select the most recent backup from the iCloud backup.

After the completion of the restore process, you will get your iPhone 11 in the original state where you left before locking it. The iCloud's Find My iPhone is an useful feature that helps the users to get rid of the disabled iPhone issue by erasing the data remotely.
iPhone Recovery mode is applicable only when iTunes failed to recognize iPhone 11. This method is quite different from the others and here you need to operate on the iPhone as well as on the computer. To know more comprehensively, go through the below-mentioned steps.
Step 1: Unplug the lightning cable from the computer and make sure there is no connection between the computer and iPhone 11.
Step 2: Turn off iPhone 11 using Power slider. Next, press and release the Volume Up button and do the same with the Volume Down button and further press & hold the slide button to enter in the recovery mode.
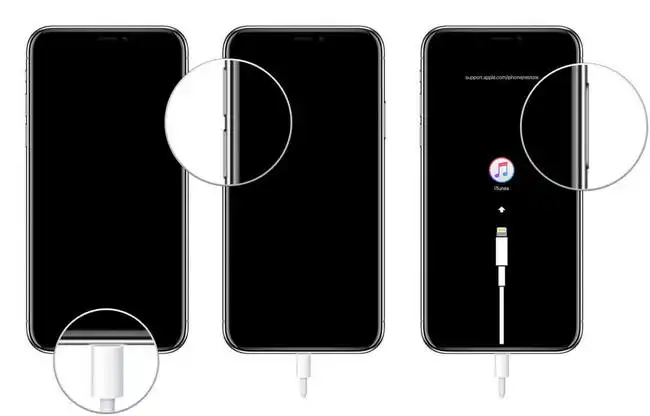
Step 3: Connect your iPhone to the computer using the cable and then launch the iTunes.
Step 4: iTunes will prompt that a device is detected and action is needed. At this point, you need to select the Restore option.
Step 5: Once the restore process is completed, you will have to set up the device and amid doing the same when you reach the App & Data section.
These were the 4 useful methods to fix a disabled iPhone 11. If you have a backup and good knowledge of iPhone, then you can go with the iTunes, iCloud, and Recovery mode methods. However, if you want to save your time and free of glitches, then nothing would be better and easier than iOS System Recovery.