For business man, I find out they usually carry out two devcies. One is iPhone and the other is Surface Pro or Surface Laptop. Somtimes, they need to transfer content such as photo, music or video from iPhone to Surface devcice. The prime solution is to sync iPhone with Surface. And after syncing, you can access your photos, videos, messages and other data easily. And then you can even take the backup on a regular interval.
To make the process easier, you need to take the help of an additional tool for cross-linking the devices. Let's have a look at the quick solutions one-by-one to transfer your data from iPhone to the Microsoft Surface Pro 7.
Supported iPhone Devices: iPhone 11, iPhone XS, iPhone XR and iPhone 8/7/6S/5S.
Supported Surface Devices: Surface Pro 7/6/5/4/3, Surface Laptop, Surface Book and Surface Go.
iPhone Manager is a quick solution to transfer up to 12 types of data from iPhone to any other devices such as Android, Surface Pro 7, Windows PC and Mac. It helps you to transfer contacts, messages, photos, videos or other files without losing its quality. And the other suggestions listed in this article can only transfer 2-3 types of data.
So if you need to move more than one type of data from iPhone to Surface Pro, then this premium solution is the best option. It is the one-in-solution for data transfer between iPhone and other devices. However, if you prefer free solution instead, which takes more time, then check out the other parts of this post.
Download iPhone Manager from its official website and install it on your Surface Pro device. After that, connect your iPhone to Surface Pro using a USB data transfer cable. Now open the installed application on Surface.
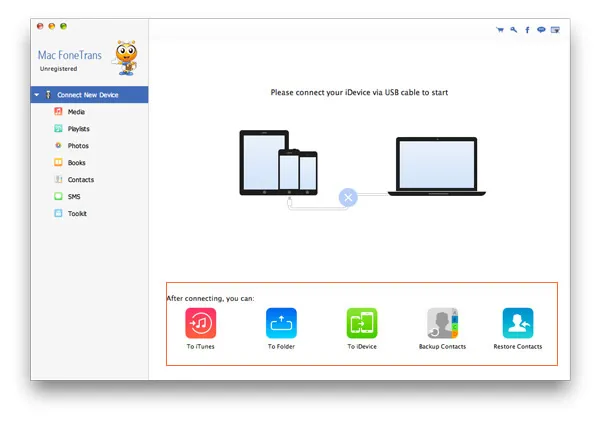
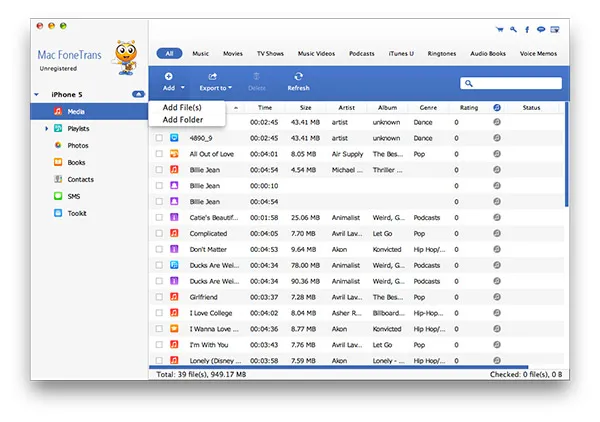
Click on the device name at upper left corner. And you will see a list of options displayed on the left sidebar, such as Media, Playlists, Contacts, Photos, SMS. In here, we will take music for example. Click on the Media tab to unfold the music library stored on this iPhone.
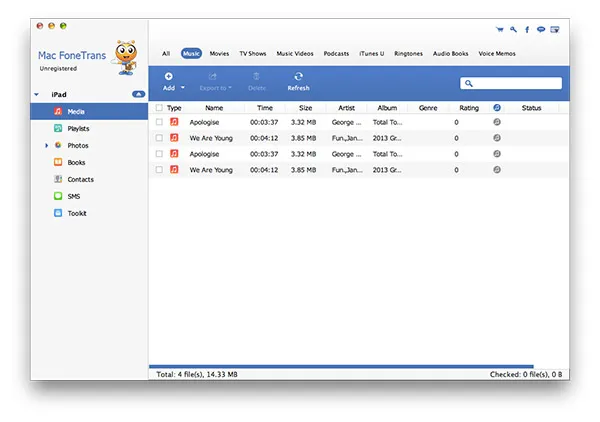
Now click the little square box at right side of each title. This will select the targe titles. After that, click Export to tab on the top menu bar. Finally, choose a local folder on Surface Pro to save those music.
This iPhone Manager is quite an easy tool to transfer the required data from iPhone to Surface Pro. The free version is limited with the features but its premium subscription will allow you to transfer multiple types of data at a time.
OneDrive is the one-stop solution provided by the Microsoft for syncing data from Surface Pro to iPhone or iPhone to Surface Pro. Follow the below steps to transfer the media and other important files from iPhone to Surface Pro.
Step 1: Navigate to Start and then click on Settings on Surface Pro.
Step 2: Move to Accounts -> Email & accounts -> Add Account.
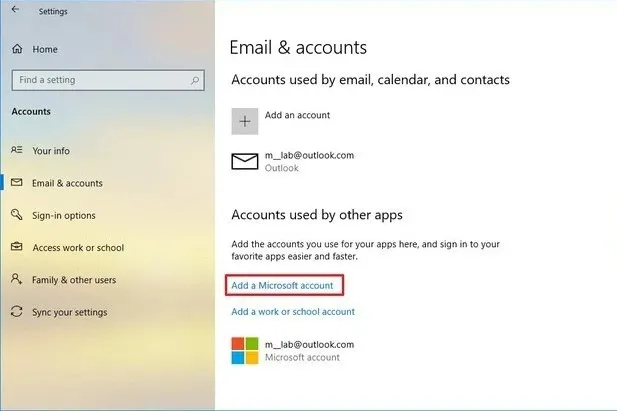
Step 3: Click Add a Microsoft account and type your Email id and password.
Step 4: Now open your iPhone and download OneDrive App from Apple Store.
Step 5: After downloading, install the app and then login with the same Microsoft account which you used on Surface Pro 7.
Step 6: Now open the OneDrive and go to Me -> Settings -> Camera Upload.
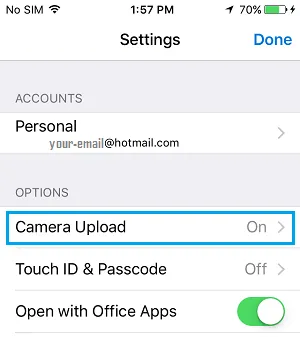
Step 7: If you want to save the videos as well on the cloud then also Turn on Include Videos option.
Step 8: After enabling this feature, whenever you take a new photo, it will be saved automatically on your OneDrive account.
Step 9: Move to your Surface Pro and select the File Explorer from the taskbar. You can see the OneDrive option is there on the left side. Just click on that. If you have already logged in with your Microsoft account, then just refresh the window. Else, you can log in again.
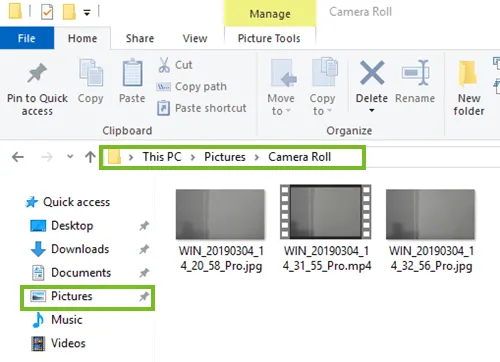
Step 10: Once you enter into the OneDrive Folder, just click on Pictures. And then go inside Camera Roll. You can see all the pictures taken from your iPhone is showing there. From here, you can open every file and then view it.
OneDrive is the free tool to use and access your saved content from any location. This way, it also helps to keep your files accessible by both devices without taking additional space on the hard drive.
Transferring the multimedia or other data is the quickest method to take backup or save a copy of your files on Windows or the Microsoft Surface Pro device.
Step 1: Connect your Surface Pro with the iPhone using USB data cable provided with your iPhone.
Step 2: It will show a pop-up on your iPhone to allow access for reading the files, just click on the Trust button to proceed ahead.
Step 3: Now come to your Surface Pro. It will show a popup to open the Folder for accessing the multimedia data. Just click on the Folder option.
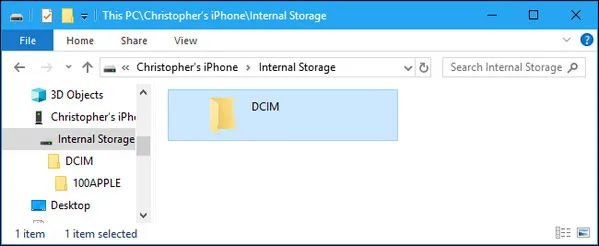
Step 4: Now open the File Explorer in your Surface Pro and click on My PC. You can see, the name of your iPhone is displaying there along with a drive icon, just open the same. It will show you the storage drive and you need to click on that.
Step 5: In the next step, you can see a DCIM folder inside, just open the same. Now you can see all photos and videos captured by your iPhone is displaying there. Here, either you can choose and select the required files only or select all at a time to transfer.
Step 6: Now right-click on the selected files and choose to copy. Finally, you will have to open the required location for saving the files and then right-click there and choose the option to Paste.
Using a USB cable to transfer the iPhone data to the Surface Pro will help you to quickly copy the files in your system. In this way, you don't need to look for some alternate ways for transferring multimedia files. However, some of the media files in third-party apps such as WhatsApp, FaceBook can not be transferred in this way.
iCloud is the cloud storage service for Apple's devices that allows you to upload and access the files from any devices. You can use the iCloud sync feature to transfer iPhone photos, videos and other data to Surface Pro.
Step 1: You need to download iCloud setup file on your Surface Pro.
Step 2: Now run the downloaded setup to complete the installation process. Double click iCloud icon shown on your desktop or open it from the start menu.
Step 3: It will prompt you to login with your Apple ID. Just complete the step by providing your Apple login credential.
Step 4: In the next window, it will ask you to choose the options to enable sync data feature. You can select either a couple of options such as iCloud Drive & Photos or can select all the options.
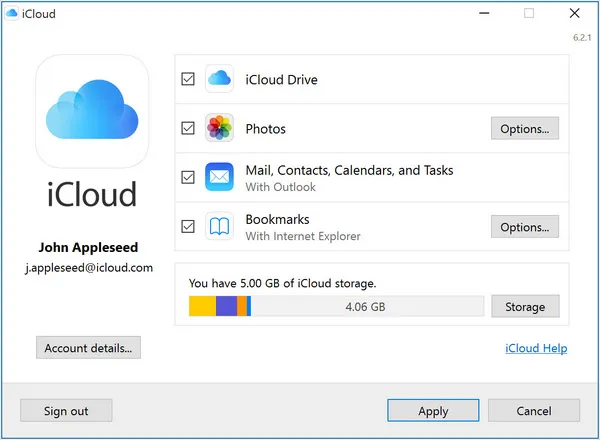
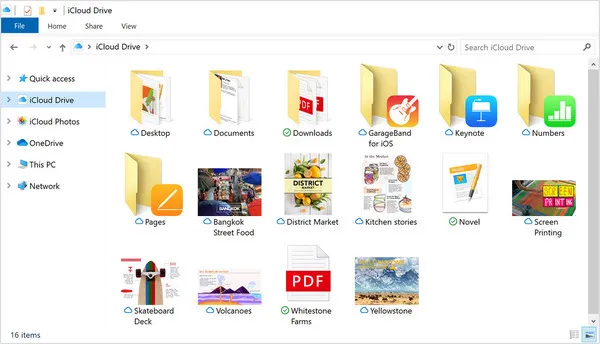
Step 5: Further, click on Apply button to permit the application to sync your data. Open the File Explorer and you will see the iCloud Drive option in the left sidebar, just click on that.
Step 6: Now you can access all your iPhone data there. Just select the required files and folders which you want to transfer into your Surface Pro and then right-click to copy it.
Step 7: After that, open the location in your system where you want to keep the files, and then right-click and choose to paste the copied files.
iCloud is another easy method to transfer files from iPhone to Surface Pro. You can easily access your iPhone data on Surface Pro 7 device.
Among all the above-listed methods, transferring data using iPhone Manager is much easier than others.However, storing the files on the cloud is always a smart choice. Using it, you can access the data such as photos, videos, music from any device and locations without transferring or downloading it in a local folder or drive. It also keeps you in the safe zone from losing the important data.