One of the most common usages of iPhone is for listening music. You can enjoy a lot of music from either iTunes store or the local music stored on your computer. According to an online survey, the number of average songs on each active iPhone is 150+. When you purchased a new iPhone let say iPhone 6S to replace the old iPhone, it definitely needs some time to move content from the old phone to the new one, especially for music as it takes more storage on an iPhone other than contacts, text messages or eBooks.
Although you can use iTunes for transfer, it’s only limited to purchased music. Besides, it takes more time to re-download the music if the number of songs is not small. So for music transfer from iPhone to another iPhone, iTunes is not the ideal solution to complete such a task because it’s more complicated and time-consuming.
In here, I am going to introduce a more simple method to solve the problem. And iPhone to iPhone Transfer is the tool being used in the following tutorial, which is the best transfer program I have ever used in regards of its efficiency. You can finish the music transfer in a few minutes even the music library is quite large. It only took 10 minutes to transfer 300+ songs from my iPhone 5 to iPhone 6S. Do you remember how much time to transfer 10 songs by using iTunes? What’s more, Phone Transfer is a full-featured program not only limited to transfer between iPhone and iPhone, it’s also capable of copying content (music, contacts, photos, sms, etc.) among iPhone, Android, Blackberry and Windows phone.
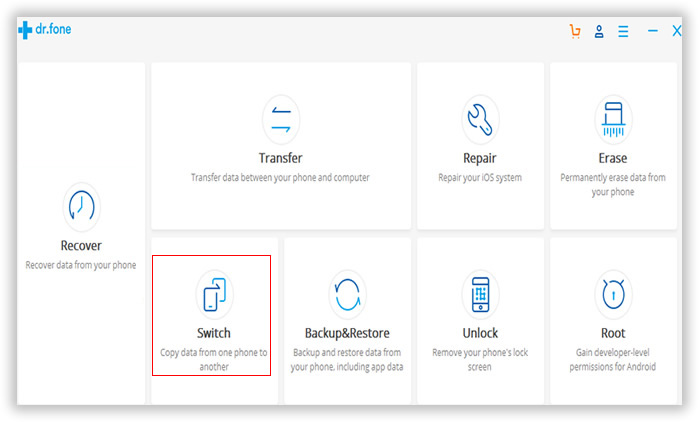
There are two versions of iPhone to iPhone Transfer: one is for Windows and the other is for Mac OS X. Download and install the program according to your computer system. Lanuch the program after installation. Here is the main interface of the program. Then click " Switch " in the primary window below.
Plug your old iPhone and new iPhone to the same computer via USB cable. When the two iPhone being recognized by the software, it will list the name of iPhone on its main screen. If the program can't scan the device, then make sure iPhone usb driver and iTunes are installed properly.
The source phone is the device you want to transfer music from and the destination phone is the one you'd like to transfer music to. If the program listed them in wrong position, click the " Flip "button on the middle to change positions.
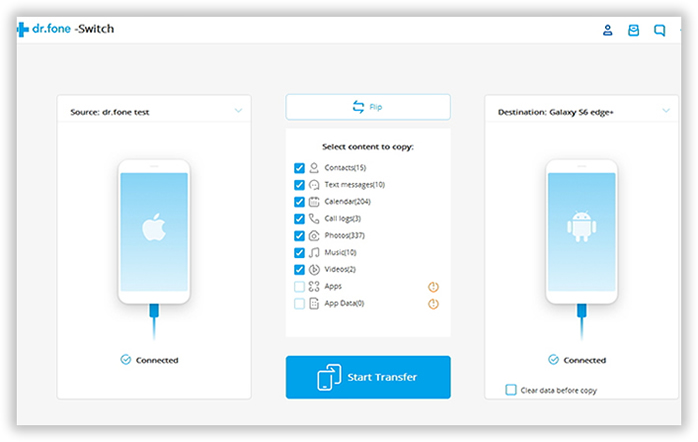
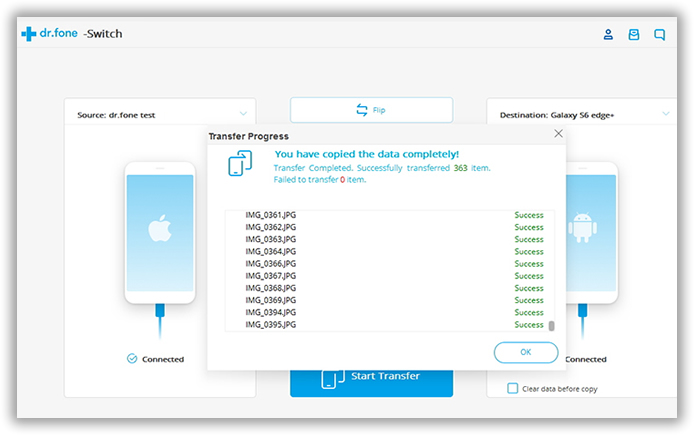
There are a few transfer options under "Select content to copy " list from the middle of the window. Select the items according to your own needs. After the content is selected, click the " Start Transfer " button to start the music transfer process. It will take a few minutes to complete, depending on how many items being selected. There is a progress bar indicating how many items being transferred.
Note: Please make sure the iPhones are well connected during the transfer. Or the content would not be copied completely.
When your get used to this iPhone to iPhone Transfer, you will never look back at iTunes or iCloud any more for data transfer. You can also use this program to permanently erase the old device before selling it to someone else. This is a great feature to protect your privacy from being leaked. If you were an iPhone user, this program is absolutely the must-have app to improve the overall user experience of the mobile device.