iPhone as the best selling smartphone since its release has been the choice for a large group of users. Although it was designed with great quality and backed up by a lot of professionals, there are cases which you had to handle the problem yourself, like restoring your iPhone from iTunes backup when your iPhone was stolen or you accidently delete your precious photos or important business contacts. Apple has done a great job on data backup by using iTunes or iCloud. However, iTunes or iCloud can’t cover all of the cases as iTunes can only recover the entire backup which means all of your current data will be deleted. iCloud is only capable of recovering a limited file types.
In one word, the methods provided by Apple are inflexible. How about only restore lost Photos and text messages from iTunes backup and leave other things unchanged? Both iTunes and iCloud can’t do any help in this case. And it is the reason that third party app comes into help. iPhone Data Recovery is a powerful data recovery app that is enable to restore all kinds of data from iTunes backup. You are free to select the files you are interested in for recovery, like photos, contacts, text messages, voice memos, eBooks or other documents. What’s more, it works pretty well on both Windows and Mac, supporting the latest Windows 8 and Mac OXS 10.9.4.
This program works both on Windows and Mac computers, please download the right version according to your computer’s operating system. The installation process is quite sample by following the built-in wizard. After that, a shortcut icon will be shown on the desktop to let your start the program quickly. The main screen shown as below:
Connect your iPhone to the computer. When the device is recoginzed by the program, choose the option of Recover from iTunes Backup File from the menu bar as you see from the main screen. This tells the program to scan the iTunes backup files stored default location of the computer. After scanning, it will list all the backup files on the center of the screen, so you can choose one of them to recover data. Or you can select the backup file from other folders if no files found by the program.
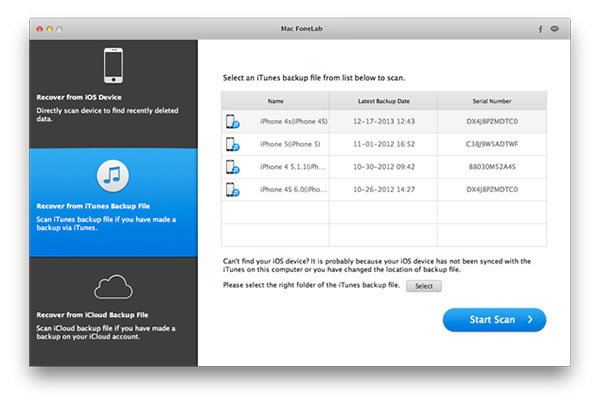
Click the Start Scan button to let the program start scanning the backup file you selected for recovery. The scanning process may take a bit longer so make sure the battery is more than 50% of the iPhone. It will scan the entire file and lists all kinds of items, like contacts, photos, messages, etc…
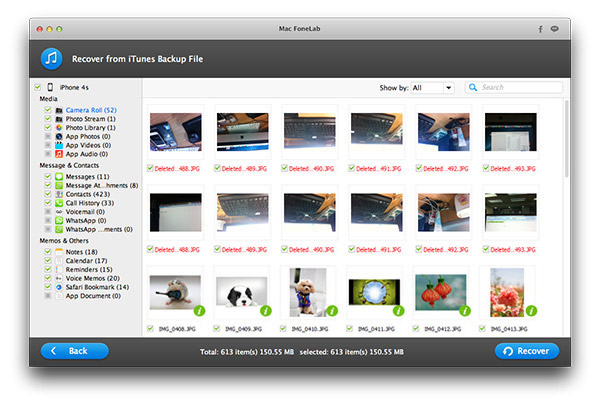
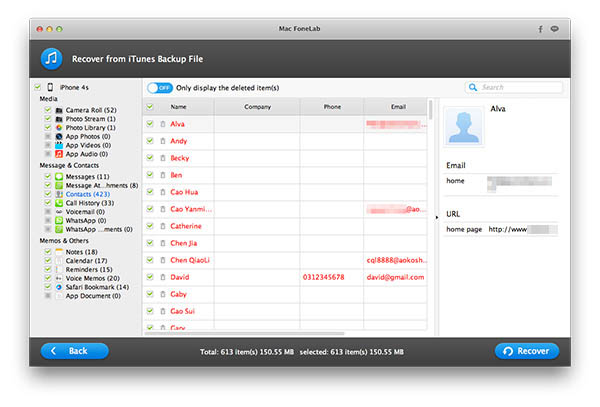
Select the items you want to recover and click Recover button to start the recovering process. This time, it only takes a few minutes to fully recover selected files. Additionally, preview is enabled for certain data types to help you restore the files you are interested in. Navigate a path on your computer to save the recovered files.
Frankly speaking, this method is more simple and flexible than using iTunes, because when connected to iTunes, it will sync items you even don’t know about that, which can easily mess up your device without any notice. This is the reason I try my best not to use iTunes. iOS Data Recovery works pretty straightforward and everyone can complete the task without any problem. It’s the best app available on the market for data recovery as far as I know.